* Please use the latest version of Chrome or Safari, which are the recommended browsers.
- What is a group?
- Creating your group
- How to create an event
- 1.Basics
- 2.Location
- 3.Details
- 4.Tickets
- 5.Settings|Form
- Preview and Publish
What is a group?
We understand that groups, communities and even fan clubs form organically when people come together for shared experiences at events on Peatix. Interactions within these circles may happen before, or long after, an event. With groups, it is our hope that we can facilitate these interactions more seamlessly. Create your group based on the contents of the events and the attendees.
Creating your group
1.Get started by creating a new Peatix account, or using your Facebook, Twitter, Google or Apple account to sign in.
* If you already have a group, you can immediately create a new event in the same group.
2.Click "Continue" to start creating your group.
If you are asked to verify your account email address, please follow the steps here.

3.The Create a Group page is shown.
On your group page you can:
- add a logo (size: 400 × 400px / format: JPEG, PNG, GIF)
- add a cover image (size: 1440 x 360 / 1280 x 320 / 960 x 240px / format: JPEG, PNG, GIF)
- add a Vimeo or YouTube video
- add a group description (try to be descriptive to encourage people to join your group)
- set a custom URL to your group page (an underscore " _ " , slash " / ", and dot " . " cannot be used in your custom URL)

Click "Create Group!" to create your group.
* It is possible to create multiple groups in your account, and you will be able to host events in each group.
Users can follow a group from the group page or event page, as well as from the order page when purchasing tickets.
Once a user becomes a follower of a group,
- Can receive automated "new event publish notification email" and "72 hours before event notification email" from Peatix.
- Account Nickname of the follower will be displayed in the follower list on the group page.
Organizer can also send out notification emails to followers.
You can gain more followers by enriching the group page.
How to create an event
Once your group is created, click “Create Event” to start creating an event
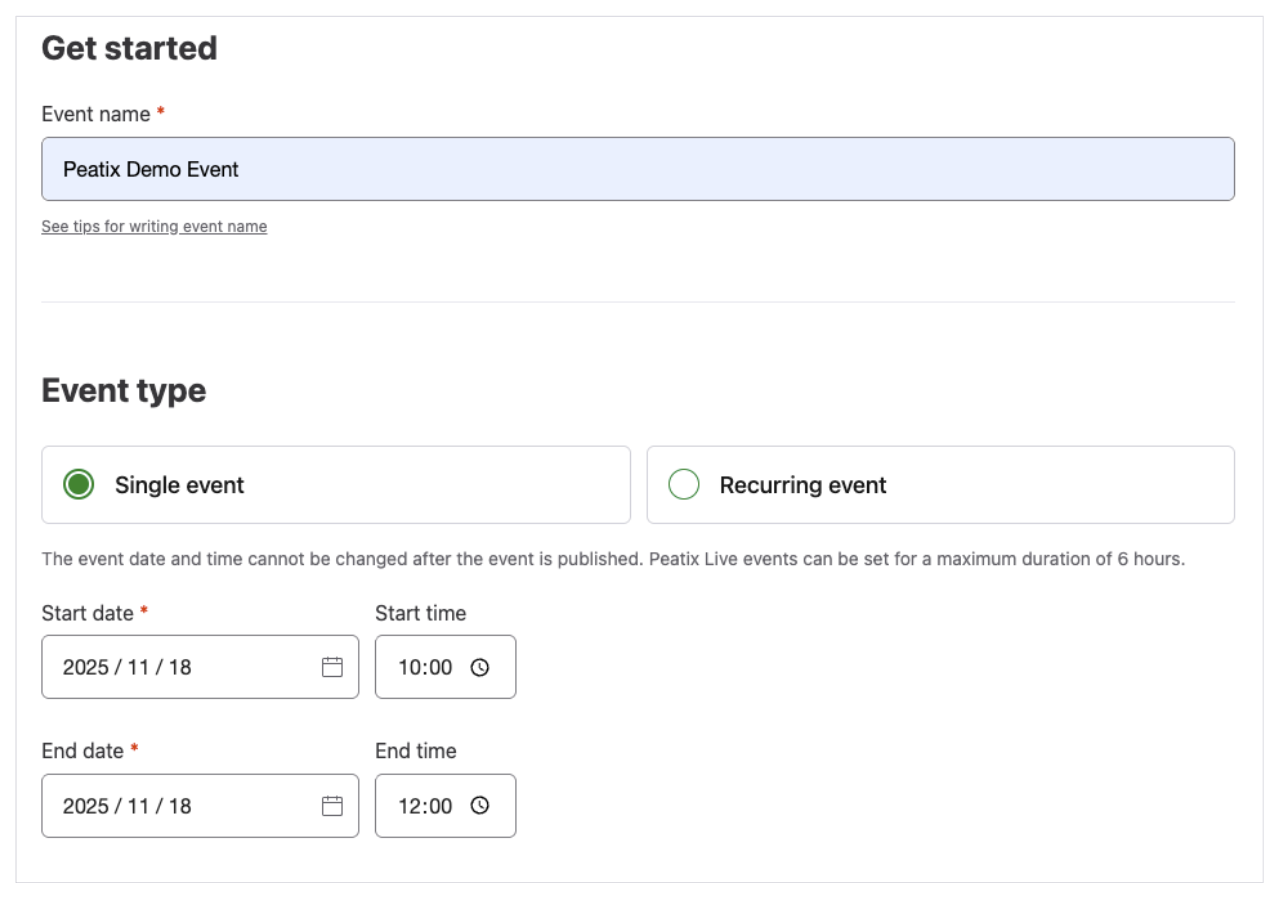
1. Basics
Enter the event name and event date.
Select “Single event” as the event type and set the date and time.
*Recurring event feature is currently only available for physical events.
If your event will be held multiple times, please refer to How can I create an event with multiple shows or time slots?
Select "Online event" under "Location type".
Enter the event date and host country. You can change the host country by clicking "Edit" next to the currency.
*Once decided, the location type and country of the event cannot be changed. To select a different location type or country, please create a new event.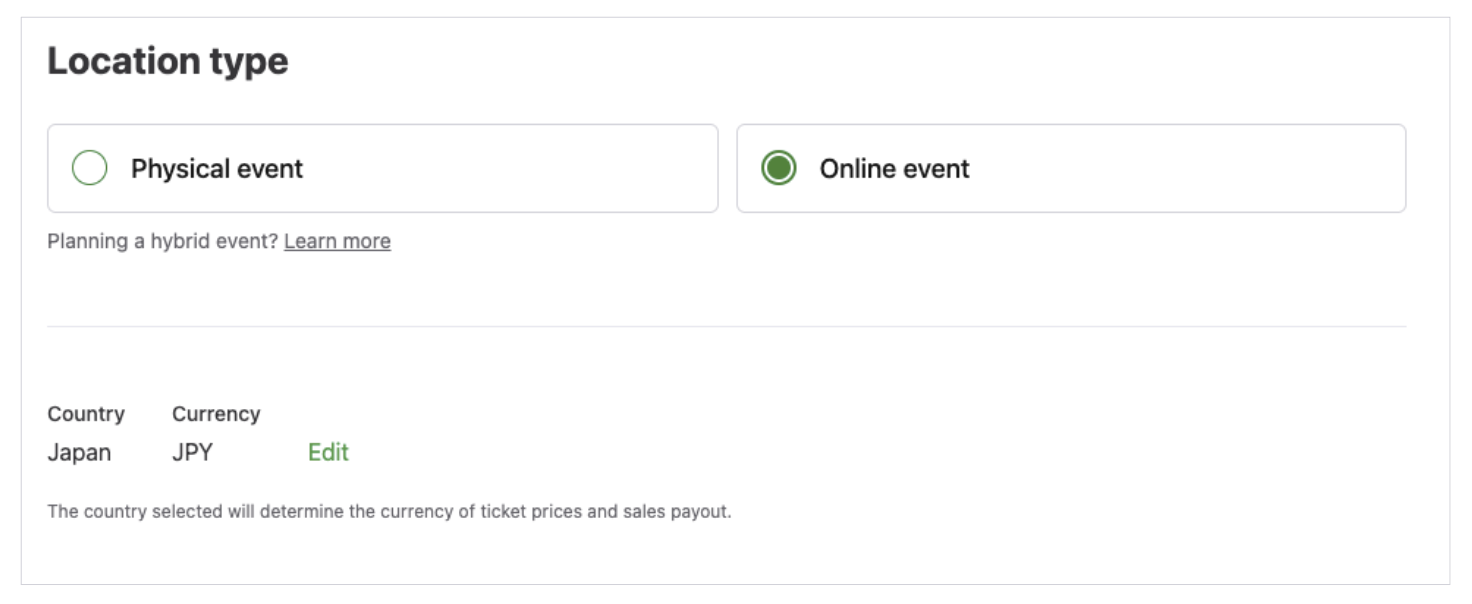
2. Location
The information you will enter on the Online page including streaming URL and event instructions will be shared with your attendees on the Watch Stream page.
For details on how to enter information on the Online page, please see: How to select/set an external streaming platform (e.g., Zoom, YouTube) for an online event.
For information on how attendees can join the online event, please refer to this help page for attendees:

"Peatix Live": Your secured live streaming platform Peatix Live is a comprehensive and high-quality streaming solution by Peatix for paid online live events. For more information, please visit Peatix Live. |
3. Details
Category
Search categories can only be set for events with the host country set to Japan, Singapore, or Malaysia. Categories cannot be set for event pages in other countries.
Cover Image
To upload your cover image, click "Add cover image" and select the file.
* The ideal size of the cover image is 920 x 450px.
* Acceptable file formats are JPEG, PNG, and GIF. PDF and TIF cannot be used.
* The maximum upload size is 5MB, including both the cover image and any image inserted in the event description.
If your cover image is bigger than the frame size, you can move the image to adjust its position and click "Done".
The cover image of the event is also shown on Peatix Search and in event recommendation emails. We recommend uploading an image that fits your event and encourages people to sign up.
Event Description
In the event description, you can enter the details and description of your event. You can also add images, videos and links in the event description.
How to upload an image: Click "Insert/edit image" and select the file of your image.
You can upload any JPEG, PNG or GIF file.
The maximum size file you can upload is 5 MB (for both the cover image and image in the event description).
The maximum width of the image is 430px.
There is no limit to the number of images you can upload.
How to upload a video: Click on the "Insert Youtube Video" button and enter the URL of your YouTube video.
How to insert a link: Select the text you wish to change into a link and click on the "Insert/edit link" button. Enter the URL and click Submit.
* Event Description is required.
* You can bold or highlight the text in red.
* It is not possible to use HTML tags in your event description.
4. Tickets
1) You can choose "Paid Ticket", "Free Ticket" or "No Ticket".
If your event doesn't require registration, please select "No Ticket".

2) Enter the ticket name, ticket price (paid tickets only), and the number of available tickets. You can create multiple tickets.
* After you have created a ticket, you cannot change the ticket name or price. If you wish to edit the ticket, please delete the already created ticket and create a new ticket. (However, if the tickets have been sold, you will not be able to delete the ticket.)
3) From "Settings" you can check the settings of each ticket.
You can set a ticket sales start date or ticket sales cutoff time for a ticket category (e.g., for creating Early Bird tickets). Please see How to set the ticket sales period for more information.
It is also possible to create discount codes for your tickets.

4) Check Event cutoff.
By default, all ticket tickets sales will stop at starting time of the event. You can change the cutoff if you wish to stop the ticket sales at a different moment.
Please see How to set the ticket sales period for more information.
5) Check Advanced settings.
Max tickets per ticket type
By default, the number of tickets (for each ticket type) that can be purchased per order is set to 6 tickets. By changing the maximum number of tickets per order, you can limit or increase the number of tickets that can be purchased per order.
Please contact us in the following cases:
1.If you have multiple ticket categories, and you wish to set a different ticket purchase limit for each ticket category.
2.If you have multiple ticket categories, and you wish to set a ticket purchase limit for the total of tickets that can be purchased per order.
Payment methods
The available payment methods differ from countries. Depending on the country, it is possible to disable some payment methods. It is not possible to edit the payment methods after you have published the event page.
Ticket transfer
Ticket transfer feature allows ticket buyer to transfer tickets to a friend by themselves. When the setting is unchecked, ticket buyer will not be able to transfer tickets regardless of the amount of tickets ordered. For more details, check this help page: About the transfer feature.
5. Settings|Form
Event Privacy Setting
You can set your event as password-protected, unlisted, or public event. Please see How can I manage my event privacy setting?

Attendee Display on Event Page
If you choose to show the attendee names and the number of attendees, these will be shown on the event page. The name of the attendee that is displayed is their account name (nickname).
Event URL
You can customize your event URL into something meaningful and easy to remember.
* An underscore ( _ ), dot (.), and slash ( / ) cannot be used in your custom URL.
* A customized URL cannot be used twice.
Emergency Contact Number
Please make sure to enter your phone number using only numbers and hyphens. There is no need to enter a country code.
Form
With the form feature, you can create a custom questionnaire for your attendees to answer. You can collect information from your attendees such as email addresses, feedback and even favorite ice cream flavor. For more information on setting up the form, please see How to use a form to collect information from attendees.
* All form data will be automatically deleted 30 days after the event has ended.
Preview and Publish
After you have created your event, click the "Preview" to preview your event page.
If you wish to ask other people involved in hosting the event to check the event page, click "Share URL" to generate a URL. Only people with this URL can access the preview of the event.

Please note that you can only see the information for tickets you have created on the Event Preview page; you will not be able to test the ticket order process. If you wish to test the process or check how the form appears, we recommend that you publish your event as "Password-protected" (for details, please refer to How can I manage my event privacy setting?). You can also test the ticket order process by setting a discount code to a ticket so that it essentially becomes a free ticket.
When you are ready to publish your event page, click "Publish".